 Brickaizer -
Help Brickaizer -
Help |
Brickaizer -
Help
Dataset structures
There are
three types of database structures as input in the Brickaizer application: 'Ministeck' and 'Lego', and data from Standard Colours. The Lego
database can also have references to real picture files (when such files are
indicated in the database). The structure of all database files is identical,
only a few tags specify the differences. It's not encouraged to edit the data
files manually without taking great care. In general .xml files are highly
sensitive to errors when a tag is not ended with the same tag, and at the same
level of depth. Bricks and Ministeck ®data sets
(brick tables) To create
a new Ministeck dataset
is also possible by using the 'Save as
Ministeck' possibility. Then only the currently selected colours are used
to create a full 5-piece Ministeck dataset. This dataset does not necessarily
have real commercially available part colours! The following structure is
always available (in green a comment or alternative tag): <?xml version="1.0"
encoding="UTF-8"?>
<color> </set>
<color> </stone>
( end tag of 'stone ID="1x1"' )
The best way to create
a new dataset is to start from an existing brick, Ministeck or Beads library, edit
and then save under a new name. All the relevant tags are copied, and potential errors
are avoided. It's not recommended to edit an existing .xml file manually (but it
can be done: very carefully). The risk of tag error is very high and the dataset
may become unusable, and Brickaizer will generate a read error. When you really
want to edit an existing .xml file use a special xml reader, like 'Programmer's
Notepad 2'. TIP: always keep a copy of the
original Ministeck and brick dataset available, in case things go for the
worse. Standard Colour data sets
The Standard
Colour sets have a different
structure than the brick, Ministeck® and Beads (and bricklink) datasets.
The reason for this difference is that these sets don't have brick
data attached, like cost, availability and files. The structure of a Standard Colour
and Beads set is quite simple: COPYRIGHT RAL gGmbH. The first
two lines are not read by the application. Good practice
is to indicate the source of the data, in this case a copyright notice,
and an indication of approximate values (in this case RAL does not allow distribution of
the real data, so these numbers are deliberately set-off by a couple of
points). The data must be structured as
follows: ID,Colour
code,Red,Green,Blue,Colour specifation, where
Red,Green and Blue are the byte values of the
colour (value range 0-255). Also ID must be a number,
while Colour code and the Colour
specification can be text or numbers. The
length of the file is not restricted, and no spaces may be used before or after
each comma. The database must be a ANSI text file and must have the file
extension .'dat'. The location of this file must be in the same folder as the
Bricklink data sets: C:\Users\Public\Documents\APP\Brickaizer\Settings. This file can also be created
using the brick database colours added. This way also existing brick colours
can be added to the database, basically avoiding to spraypaint a brick that
already has a good colour. The combinations are basically
endless. TIP: this file structure
is fundamentally the same as an
excel '.csv' file. To make such a file you can also open a new spreasheet,
add the values in columns and then save as a 'Comma separated value' (or '.csv') file.
Then finally change the file extension to '.dat'. That works quite good
as well. Comma Separated Values files
The .csv files
can be used to manually and quickly edit the colour and brick data. It's useful
for advanced users, and requires great care to assure the data structure is not
compromised (and therefore corrupting the table). The data structure is fixed
and, except for a few possibilities, can not be changed. In raw text format the table looks
like this: Multiplier,1000,,,,,,,,,,,,, In excel the same table is read in
cells, and after some visual formatting, it should look like
this:
Shaped Pegboards
Although not actively supported, the
user can add new shaped pegboards. The pre-installed boards are stored in C:\Users\Public\Documents\APP\Brickaizer\Pegboards. The user is highly encouraged to first study the lay-out of these pegboards
before attempting to create and add new ones. These are the
guidelines: To make a good shaped pegboard is a
tedious and time consuming job, where a good bitmap editing application (e.g.
Photoshop) is required. Some tips: You will be rewarded when all of this
is done properly!
<dataset>
<unity>10000</unity> ( this
is the value of currency meaning: every value in the data must be divided by
1000 )
<library>Ministeck</library> or <library>Lego</library> or <library>Beads</library>
<bricklink>True</bricklink> ( only valid for brick datasets, is ignored for Ministeck
and Beads libraries )
<folder>C:\Users\Public\Documents\APP\Brickaizer\Colortables\Bricks</folder>
or <folder/> for non-picture
sets
<catalogue>1.7.12.1</catalogue> ( only used for brick datasets, is ignored in Ministeck and
Beads )
<combo>False</combo> ( only used for brick datasets, is ignored in Ministeck and
Beads )
<set number= "24"> ( in this Ministeck example 24 colours are found; number is ignored in
the file, for convenience only )
<color
number="31601">
<name>Beige
31601</name>
<red>236</red>
<green>225</green>
<blue>135</blue>
</color>
....
</color> ( these tags are
repeated for every colour, in this Ministeck example 24 colours are found )
<bricks> ( now the bricks are indicated; sorted
per brick per colour )
<stone ID=
"1x1"> (
text data; must be put between two quotes )
<color
number=
"31601">
( text data; must be
put between
two
quotes )
<name>Beige
31601</name>
<width>1</width>
<height>1</height>
<cost>75</cost>
( in
this Ministeck example the cost of this piece is 75/1000 = 0.075 cent [unity
value =
1000]
)
<amount>0</amount>
<file>No
file</file>
or when a brick picture is
used: <file>Blue_1x10.jpg</file> where the base folder is indicated
in the 'folder' tag at the beginning of the file
</color>
<color
number="31602">
<name>Black
31602</name>
<width>1</width>
<height>1</height>
<cost>75</cost>
<amount>0</amount>
<file>No file</file>
</color>
....
</color> ( repeated for each colour per brick )
<stone ID="1x2">
<color number="31601">
<name>Beige
31601</name>
<width>1</width>
<height>2</height>
<cost>32</cost>
<amount>0</amount>
<file>No file</file>
</color>
</stone>
<stone>
....
</stone> ( repeated for every brick, having several
colours )
</bricks>
</dataset>
TABLE BELOW MAY CONTAIN
APPROXIMATE VALUES.
1,RAL 1000,198,183,137,Green beige
2,RAL
1001,205,175,134,Beige
3,RAL 1002,209,167,104,Sand yellow
4,RAL
1003,246,171,0,Signal yellow
5,RAL 1004,224,155,0,Golden yellow
6,RAL
1005,197,145,2,Honey yellow
7,RAL 1006,213,150,0,Maize yellow
8,RAL
1007,227,147,0,Daffodil yellow
Colours,39,,,,,,,,,,,,,
Bricks,4,,,,,,,,,,,,,
,,,,BrickID,,3001,3003,3004,3005,,3001,3003,3004,3005
,,,,,,2,2,1,1,,2,2,1,1
,,,,,,4,2,2,1,,4,2,2,1
ID,Name,R,G,B,,Cost,,,,,Amount,,,
1,White,255,255,255,,15,6,5,5,,0,0,0,0
86,Light
Bluish Gray,175,181,199,,14,9,8,6,,0,0,0,0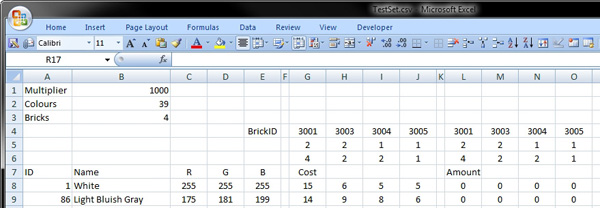
Cell B1: the currency
multiplier
Cell B2: the amount of
colours
Cell B4: the amount of unique
bricks
Row 4: brick identifiers, columns
G-J must be identical to columns L-O.
Rows 5 and 6: the amount of studs
for each unique brick, smallest in row 5
Columns F and K (in this
example): empty separators, does not contain data
Row 7: only used for labels, does
not contain data
Row 8 and beyond: colour
data
Column A: colour identifier (a
number)
Column B: colour name (text,
cannot contain commas)
Columns C-E: RGB colour
coordinates in byte values (0-255)
Columns G-J (in this example):
cost data, matching with the currency multiplier
Columns L-O (in this example):
amount dataAdding a new brick can be done by inserting two new
columns to the right of each block of cost and amount data. As a consequence
also the bricks value (B3) must be modified accordingly. Similarly, adding a new
colour can be done by inserting a new row, or starting to add data after the
last row in the table, filling it according to the conventions explained in
this paragraph. As a consequence also the Colours value (B2) must be
modified accordingly.
The pegboard must be a PNG file
format, and only contain black and white pixels.
The final size of the pegboards
will depend on the number of pegs.
The average distance between each peg
(black dot) must be between 10 and 12 pixels.
Each peg is represented by just
one black pixel.
The minimum space between the bitmap
edge and the closest black pixel for left and top edges is 5
pixels
The minimum space between the bitmap
edge and the closest black pixel for right and bottom edges is 15
pixels
Start with a large enough canvas
(e.g. 500 x 500 pixels).
Avoid in any
case a resize of the canvas after you have defined
the pegs/pixels. Resampling will create areas of 2 or more pixels in
shades of gray, and you can basically start again by deleting each second or so
pixels to only remain 1 black pixels per peg.
Make sure you are absolutely
working in black and white (255 and 0 pixel values).
When you use
an existing picture of a pegboard, the work gets easier, but expect quite a
few corrections for exact placement of the overall grid of pegs. A good starting
picture is evenly lit with the pegs clearly standing out when e.g. a filter,
or a change in contrast and/or lightness is applied.
Test, test and test again.